The Shortest Possible Route
A race course is defined by the shortest possible route that a runner could take and not be disqualified. A given runner might not follow the shortest possible route, just as a runner on a track may be forced to run further to pass another runner. The actual path of any given runner is irrelevant. The shortest possible route is a reasonably well-defined and unambiguous route that ensures all runners will run at least the stated race distance.
You might envision the shortest possible route as a string, stretched tightly along the course so that it comes within 30 cm (one foot) of all corners, straight through S-turns, and diagonally between corners when crossing a street. You should measure the course following the same route as that hypothetical string.
Because it is difficult to follow the shortest possible route perfectly, an extra length factor of 0.1%, called the short course prevention factor, is incorporated into the calibration procedure. Use of the factor ensures that your course will not be short, even if you make small errors in following the shortest possible route.
When making a turn, measure prudently close to the curb or edge of the roadway. Thirty centimeters (one foot) from the edge of the roadway is a good quide. Often manholes, storm drains, broken pavement, and other hazards render this impractical. In such cases, attempt to measure the shortest route that a runner may be expected to take. You may wish to walk the bicycle through such sections if they are relatively short.
There are three basic situations encountered in following the shortest possible route. First, if you enter a roadway by making a right turn and leave it by making another right turn, follow a path prudently close to the curb around both turns and in-between.
Second, if you enter a roadway by making a right turn and leave it by making a left turn, move in as straight a line as possible, diagonally from where you entered on the right to the most extreme left position available to the runner just before making the second turn. Again, make the second turn as prudently close to the curb as you can. In the case of heavy traffic, you may wish to employ the "offset maneuver" described in Appendix A (Supplementary Tips).
Third, when measuring on a winding roadway, do not follow the side of the road. Unless portions of the roadway will be closed to runners by cones and/or barricades and will be monitored, measure the straightest and shortest path possible, moving from one side of the road to the other as necessary to follow the shortest possible route. This may be an unsafe practice on heavily travelled roads. You may need to measure with a police escort or measure during periods when traffic is light.
When measuring a turn-around point, cycle up to the position of the turn-around point, freeze your front wheel with the brake, spin your bike 180 degrees, and continue on with the course measurement (see the figure below). Even though you have measured the turn-around this way, you still have two choices for how you describe it on the map. One is to simply describe it exactly how you measured it, as a single point where a cone should be placed.
But no runner turns instantaneously, spinning on one foot. If a course features a turnaround point, you have an option to control how runners negotiate the turn. When a course is measured to a single point, reverse direction and then back, no allowance is made for how runners actually run the turn. Marking a turnaround with a single cone ignores the semi-circle path taken. This is a trivial distance, but if enough road width is available a larger radius turn can be employed. A radius, or semi-circular turn helps a runner maintain speed and avoids groups of runners bunching up at the turn-around.
Assume you have measured and marked a turnaround point "A" as described above. Now you want to construct a half-circle turnaround with radius "r". Where is the center ("C") for that circle?
The circumference of a circle is (π) x (diameter), or (2π) x (radius). The circumference of a half-circle is (π) x (radius) (shown in red below). Imagine unwrapping this half-circle arc from the circle, straightening it out, then folding it in half. When aligned with "A", this shows that "C" should be located at a distance of (π/2) x (r) short of "A". A close approximation to this is 1.57r.
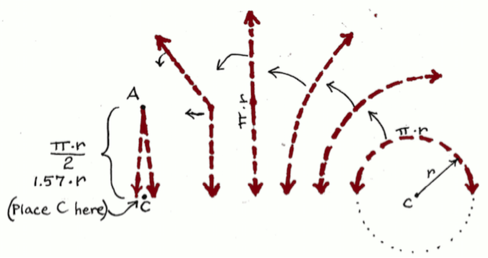
Once you have marked "C", you can mark a half-circle coning line. The cones should be 1 foot or 30 cm inside the calculated semicircle for running. Draw a half-circle with radius of (r - 1 ft); cones are to be placed along that line as shown. Note that the point "A" is also marked. In an emergency (e.g. there are not enough cones to construct the planned half-circle, or there is a road obstruction that makes the smooth turn impractical) you can place a cone at "A" and tell runners to go around it.
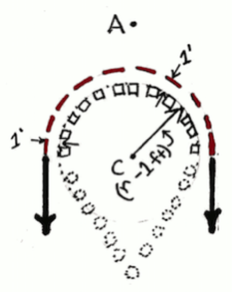
The cones along the semicircle are required and should be closely spaced. The cones "below" the semicircle (making an "ice cream cone" shape) are not required but can help the runners see where to go.
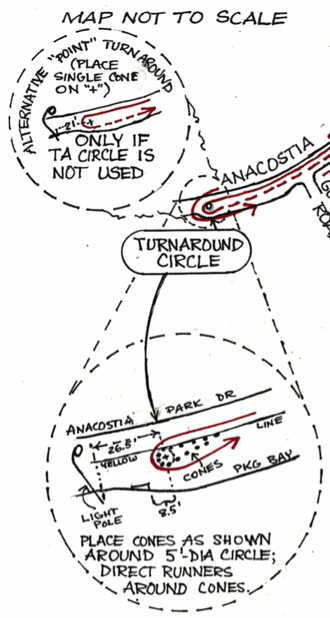
When describing the turn-around on your certification map it is best to describe the location of both turn-around alternatives. An example of how to describe the turn-around is shown in the figure below, where the locations of the center of the semi-circle TA (point "C"), and the location of the single point TA (point "A") are both described relative to permanent landmarks. Note that you must also include the radius length "r" on your map.
The course must be measured as it will be when the race is run. In particular, detouring around cars or other obstacles which may not be present on the day of the race will make the course short (see Supplementary Tips).
If your course is laid out to restrict the runners to a route which is longer than the shortest possible route (on pavement), traffic barricades or intensive coning is required. Course monitors are nice but often are absent, mis-positioned, or simply ignored by the runners. Instruct course monitors to disqualify on the spot, any runners they observe cutting the course as defined by the barricades and cones.
The locations of barriers must be marked on the road, and their exact locations put on the map. You should be prepared to document every such marker that you put in place. If this seems like too much trouble, you should assume that runners will short-cut all they can and measure that way, even if the runners are instructed to run a longer route.
If you restrict the runners to one side of the road, be sure you specify how the corners are to be turned. It makes a difference. There should be no doubt of the exact measured path.
If you cannot enforce the restrictions, it's best to measure the shortest possible route and leave race-day coning as the race director wishes it.
Sometimes the paved route is likely to be ignored by the runners. Plan for this, and measure across the grass in those areas where the runners are likely to shortcut. Be sure the route you choose is bounded by something that is permanent.
Sometimes the sides of the road are poorly defined. For example, the Fiesta Island 10 km has a paved road with firm dirt shoulders that some runners prefer to run on.

Selecting the exact running/measuring route is a matter of judgment. It is probably best to remain on the pavement but as close to the dirt edge as possible unless the dirt route is obviously shorter. In that case, you should measure the shortest route on the dirt.
In summary, study is required to determine the shortest route that can actually be run, whether it be in the street, on the sidewalk, or on the grass or dirt.
| Go to Next Section: | Use of the Calibrated Bicycle |
| Previous Section: | Calibrating the Bicycle |
| Back to: | Table of Contents |