Course Maps
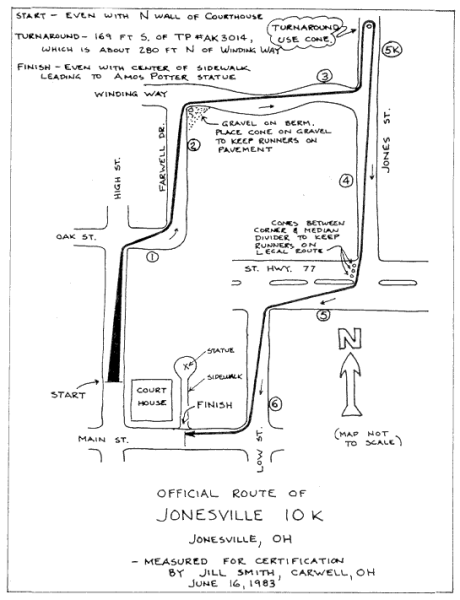
The course map is the most important documentation of your course. Its purpose is to provide, ideally on a single sheet of paper, all the information a race director needs to run the race using the course as certified. This documentation is of great value in case a record is set on the course and a “verification” measurement is needed.
Be aware that after a course is certified, its map is scanned and posted online. So, your work will be on display for all to see. These online maps may be viewed by runners who wish to run the race, by race directors who are setting up the course on race day, or by race directors who are thinking of hiring a measurer and want to see what kind of work they’ve done.
Without good documentation for the course, mistakes could easily be made in laying out the course on race day. By the time of next year's race, there may be a new race director who knows nothing about the original course measurement. In addition, all the marks you've painted on the road may have faded into oblivion by the following year!
The map should fit on a single page of US Letter size (8.5x11 inch) or A4 paper along with any blow-up or detail maps. The map need not be drawn to scale or include every single cross-street or landmark. In fact, the best maps enlarge sections where more detail is needed to show how the course is to be run, and shrink sections where less detail is needed. Colors are permitted but you should avoid dark background colors as that type of map is not easy to read when printed. Photographs and satellite images are permitted; however, it should be kept in mind that the size of the final map file must be less that 400kb, and this may be difficult if photographs and/or satellite images are included. It is best to talk with our certifier before including these types of images in your map.
The map should include a line representing the actual measured path through the course. Use this line to show how you angled between corners and how you took each turn, including turn-arounds. In order to show the measured path, "widen" the streets or roads relative to their length. You may need to further distort the scale to display all relevant detail. (But note: If you did an "offset maneuver" to deal with traffic as explained in Appendix A, do not draw it on the map, as this could be very confusing to race directors; instead draw the desired diagonal path that the offset maneuver was intended to approximate.)
Another option is to describe the way runners will be restricted on each road. For example, if runners are restricted to only the right lane you could include a note saying "runners restricted to right-hand lane on Main Street" instead of explicitly showing a course path that uses only the right lane.
The line representing the measured path indicates the very shortest route that runners may be permitted to take during the race. If the race director chooses to restrict the runners' path in such a way that they have to run farther, that is OK. But the runners may not be permitted to run any shorter than the measured path or the certification will be invalid.
If your measured path was not always the shortest possible route that a runner could run using any part of the street or road, then traffic barricades or cones must be set up to ensure that the runners cover at least the distance you measured. Your course map must indicate exactly where such barriers are to be placed and also show where monitors are to be stationed. If this seems like too much trouble, just measure the shortest route assuming no barricades and you'll be safe.
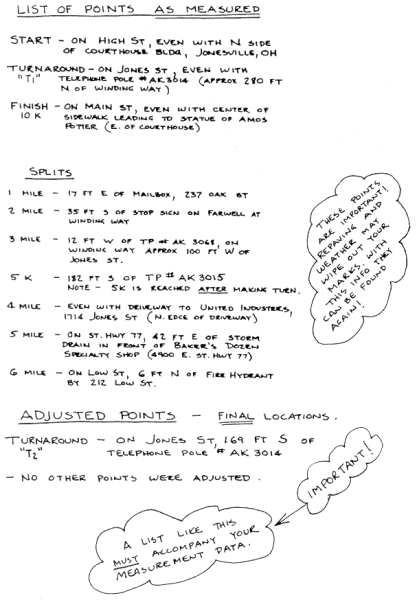
Your map must include descriptions of the exact locations of the start, finish, and any turn-around points. This is done by giving precise tape-measured distances from nearby permanent landmarks. In writing such descriptions, do not assume that your painted marks on the road will still be visible. Instead, think of your descriptions as instructions for re-locating the marks without having to remeasure the entire course in case the road is repaved. In complicated cases, it may be necessary to include detailed blow-up maps of some or all of these points.
In addition to your start, finish, and turn-around points, you should provide documentation for your intermediate splits so they can be relocated when necessary. It’s best to include all documentation directly on your map, but if this would make the map too cluttered, you may provide your list of split descriptions on a separate sheet.
Clearly label all streets and roads used for the course. Indicate kilometer/mile marks with circled numbers and units. Use arrows to indicate the direction of the race.
Another important requirement when drawing maps is that there should be a margin of 1 cm (3/8in) on all sides. If you are using A4 paper, you should increase the margin at the top and bottom to 2 cm so the map will have adequate margins when copied to US Letter size paper.
Several examples of course maps have been included in Appendix C for your reference.
| Go to Next Section: | Appendix A - Supplementary Tips |
| Previous Section: | Use of the Calibrated Bicycle |
| Back to: | Table of Contents |